Is Your Body Trying to Tell You Something? Pay Attention to These Warning Signs!

Hey there, age is just a number, but it’s important to listen to our bodies as we get older. Sometimes, they send us warning signals that something may not be right. Don’t worry, we’ve got you covered! In this article, we’ll explore some common warning signs that your body may be trying to tell you something important. Remember, it’s always better to be safe than sorry, so let’s dive in!

1) Hair Thinning and Flaking: A Physical Warning

If you notice your hair thinning and experiencing dandruff, it could be a sign of a nutrient deficiency. Your body may be lacking essential vitamins like zinc, iron, or B vitamins (B2, B3, B6, and B7). Don’t panic just yet, incorporating a balanced diet or supplements can help restore your hair’s health.

2) Hands with Wrinkles: A Natural Phenomenon or Something More?

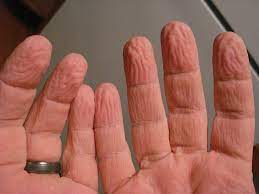
As we age, wrinkles on our hands are natural. However, if you notice an excessive amount of wrinkles, it could be a sign of dehydration, thyroid issues, or poor blood circulation. To keep your hands looking and feeling their best, make sure to stay well-hydrated and consider moisturizing regularly.

3) Bodily Signals: White Spots on the Tongue

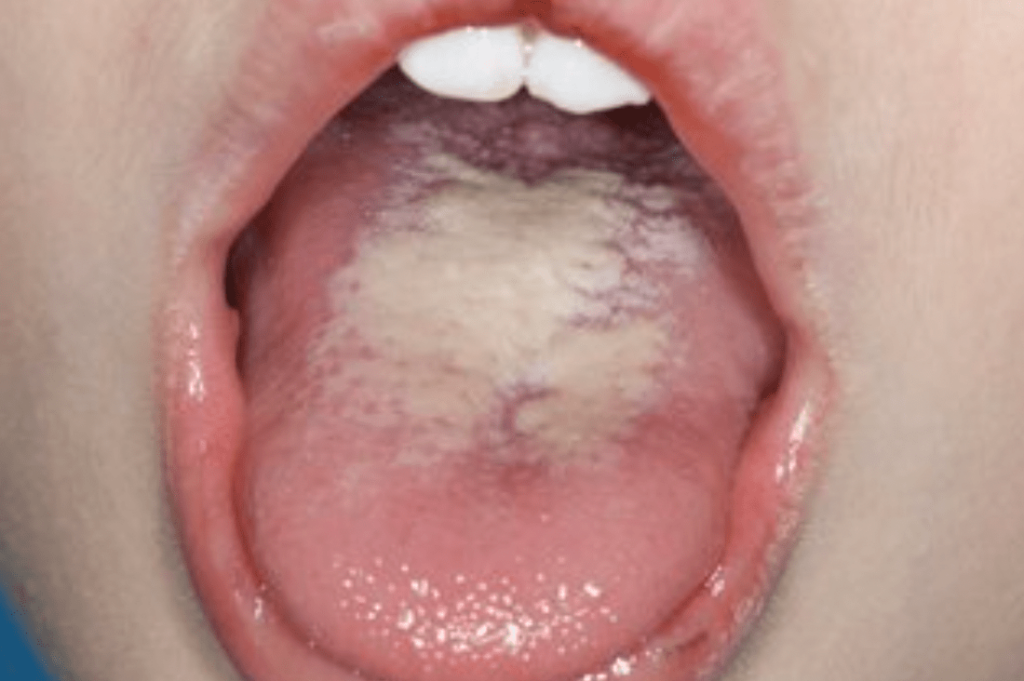
Proper oral hygiene is essential, and neglecting it can lead to white spots on your tongue. However, white spots could also be a symptom of oral thrush, which is more common among diabetics. Make sure to maintain good dental care and consult your dentist if you have any concerns.

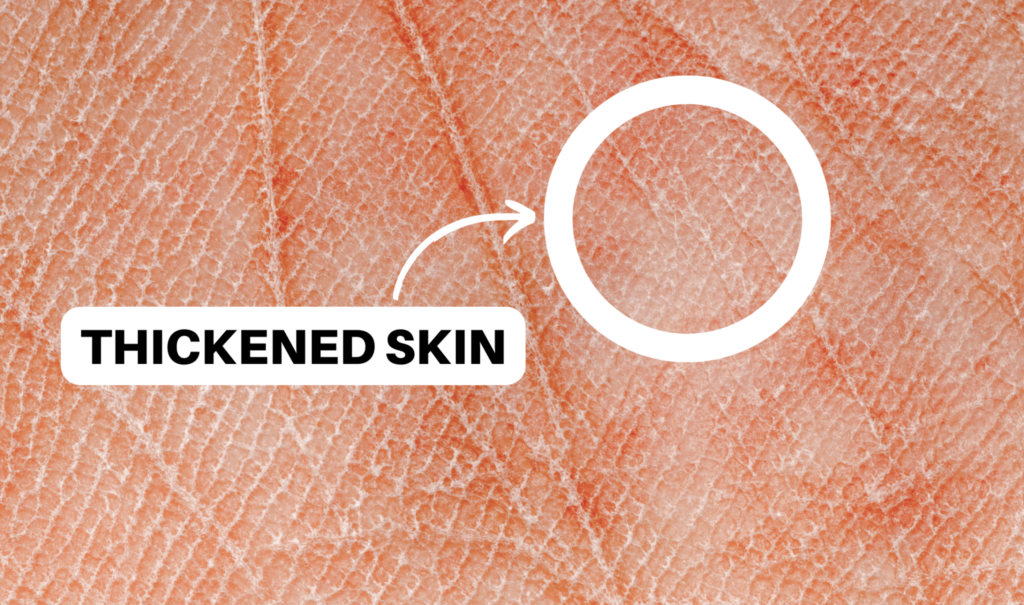
4) Rashes on the Skin: Not Just a Superficial Issue

Skin rashes can have various causes, such as infections or contact with certain plants. While they may seem harmless, rashes can become a serious health risk if they get infected. It’s important to take proper care of your skin, and if you notice any persistent or worsening rashes, consult a healthcare professional.

5) Swollen Ankles: A Hint About Your Salt Intake and Health

Swollen ankles are often a sign of high salt intake, poor blood flow, or an underactive thyroid. If you notice your ankles swelling, it may be time to reevaluate your diet and lifestyle choices. Remember, moderation is key, and a visit to your doctor can provide further guidance.

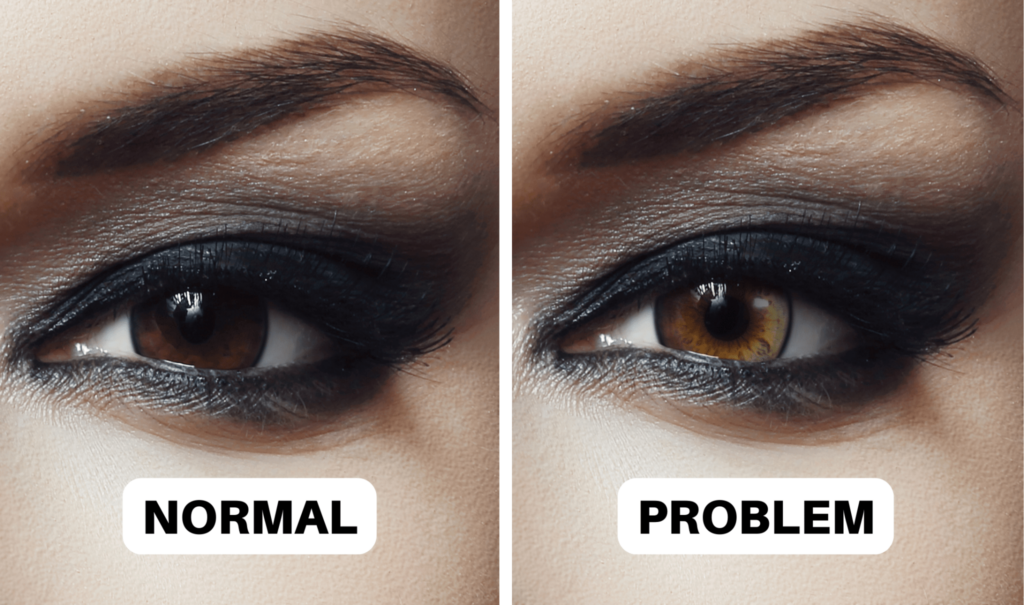
6) Dry Eyes and Dry Mouth: Listen to Your Body’s Thirsty Signals

If your eyes are constantly itchy or burning, they may be dehydrated. Dry mouth is another symptom that warrants attention. It could be a result of Sjogren’s syndrome, an autoimmune illness. Stay hydrated, and if you experience persistent dryness, consult a healthcare professional.

7) Signs Your Body Is Bloating: Are You Sensitive to Certain Foods?

Bloating can be uncomfortable, but did you know it could be a sign of food sensitivity? If you often experience bloating or stomach distention after meals, you may have a dietary intolerance or allergy. Keep a food diary to identify potential triggers and consult a doctor or nutritionist for personalized advice.

8) Bruises: More Than Just a Clumsy Mishap

Unexpected bruising might indicate a deficiency in essential vitamins or a problem with blood coagulation. Don’t brush off these bruises as mere accidents. Consider incorporating a well-balanced diet rich in vitamins and consult your doctor if bruising persists.

9) Persistent Hunger: Is It About Dehydration or Something More?

Staying hydrated is crucial, but excessive hunger can be a sign of imbalance. Constant thirst and frequent urination can be indicators of prediabetes. It’s important to strike a balance in your diet and lifestyle, and if you have concerns, consult a healthcare professional.

10) Twitching Muscles: The Body’s Way of Saying “Take It Easy!”

Muscle twitching can happen to anyone, especially after physical exertion. Stress, lack of sleep, renal problems, and neurological disorders can also cause muscle twitches. If muscle twitches become persistent or affect your daily life, it’s time to involve your doctor for further evaluation.

In some cases, persistent snoring may indicate obstructive sleep apnea (OSA). If you or your partner notice excessive snoring, it’s crucial to address it as it may require medical intervention to ensure proper breathing throughout the night.

Remember, this article serves as background reading, and if you ever need medical guidance, don’t hesitate to consult a healthcare professional. It’s important to take good care of your body and pay attention to these warning signs it sends you. How frequently do you make appointments to see your doctor? We’d love to hear your thoughts in the comments!

PUMPKIN PECAN COBBLER

Indulge in the perfect blend of pumpkin and pecans with this delightful Pumpkin Pecan Cobbler recipe. This warm and comforting dessert is the epitome of fall flavors, bringing together the richness of pumpkin, the crunchiness of pecans, and a touch of spice. Whether you’re hosting a gathering or simply craving a taste of autumn, this cobbler is sure to be a crowd-pleaser.

Ingredients for the Cobbler:

INGREDIENT QUANTITY
All-purpose flour 1 cup + 3 tablespoons
Baking powder 2 teaspoons
Salt 1/2 teaspoon
Granulated sugar 3/4 cup
Cinnamon 1 teaspoon
Nutmeg 1/2 teaspoon
Cloves 1/2 teaspoon
Pumpkin puree 1/2 cup
Milk 1/4 cup
Melted butter or vegetable oil 1/4 cup
Vanilla 1 1/2 teaspoons

Ingredients for the Topping:

INGREDIENT QUANTITY
Granulated sugar 1/2 cup
Brown sugar 1/2 cup
Chopped pecans 1/4 cup
Very hot water 1 1/2 cups

Instructions:

  1. Preheat your oven to 350 degrees.
  2. In a medium-sized bowl, whisk together the all-purpose flour, baking powder, salt, granulated sugar, cinnamon, nutmeg, and cloves. Set this dry mixture aside.

In a smaller bowl, combine the pumpkin puree, milk, melted butter or vegetable oil, and vanilla extract. Mix until well incorporated.

  1. Instructions:

      1. Preheat your oven to 350 degrees.
      2. In a medium-sized bowl, whisk together the all-purpose flour, baking powder, salt, granulated sugar, cinnamon, nutmeg, and cloves. Set this dry mixture aside.
      3. In a smaller bowl, combine the pumpkin puree, milk, melted butter or vegetable oil, and vanilla extract. Mix until well incorporated.

    1. Pour the wet ingredients into the bowl with the dry ingredients. Stir until you have a thick batter.
    2. Transfer the batter into an 8-inch casserole dish with high sides.
    3. In a separate bowl, mix together the granulated sugar, brown sugar, and chopped pecans.
    4. Evenly spread the sugar and pecan mixture over the batter in the casserole dish.
    5. Now, without stirring anything, carefully pour the very hot water over the top.
    6. Place the casserole dish on a baking sheet to catch any potential overflow. Bake for around 40 minutes or until the middle is set.
    7. Once baked, remove from the oven and allow it to cool for 5-10 minutes before serving.
    8. Serve your Pumpkin Pecan Cobbler with additional chopped pecans and a scoop of vanilla ice cream for a truly indulgent experience.

    Enjoy the wonderful medley of flavors that this Pumpkin Pecan Cobbler brings to your taste buds. With the sweetness of the pumpkin, the nutty crunch of pecans, and the warm spices, it’s a dessert that embodies the essence of autumn.

    Frequently Asked Questions:

    Can I use fresh pumpkin instead of pumpkin puree?

    Yes, you can use fresh pumpkin puree if you prefer. Simply roast and puree the pumpkin before adding it to the batter.

    Is it necessary to use both granulated and brown sugar for the topping?

    Yes, the combination of granulated and brown sugar adds depth of flavor to the topping. The brown sugar also provides a caramelized richness.

    Can I substitute a different type of nut for the pecans?

    Absolutely! Feel free to use walnuts, almonds, or any other nut of your choice in the topping.

    Can I make this dessert ahead of time?

    While it’s best enjoyed fresh, you can prepare the batter and topping ahead of time. Assemble and bake the cobbler just before serving for the best results.

    Can I freeze leftover cobbler?

    Yes, you can freeze any leftover cobbler. Just ensure it’s tightly wrapped to prevent freezer burn. When ready to enjoy, thaw and reheat in the oven.

    Can I serve this cobbler with a different type of ice cream?

    Absolutely! While vanilla ice cream complements the flavors well, you can get creative with your ice cream choices. Try cinnamon, caramel, or even maple-flavored ice cream.

    Indulge in the cozy flavors of fall with our Pumpkin Pecan Cobbler. This dessert brings together the sweetness of pumpkin and the crunch of pecans, all topped with a warm, comforting cobbler texture. Whether shared with friends and family or savored as a personal treat, this dessert is the perfect way to celebrate the beauty of autumn.


Outback Steakhouse Alice Springs Chicken

If you’ve ever dined at Outback Steakhouse, chances are you’ve fallen in love with their scrumptious Alice Springs Chicken. This delightful dish boasts tender grilled chicken topped with sautéed mushrooms, crispy bacon, melted cheese, and a honey mustard sauce that perfectly complements its flavors. In this article, we will present the complete Outback Steakhouse Alice Springs Chicken recipe along with a comprehensive table sheet format of the ingredients. Prepare to tantalize your taste buds and impress your family and friends with this delectable homemade version.

Ingredients

INGREDIENTS QUANTITY
Boneless, skinless chicken breasts 4 pieces
Honey mustard sauce 1/2 cup
Sliced mushrooms 1 cup
Crispy cooked bacon 8 slices
Colby Jack cheese 1 cup
Cheddar cheese 1 cup
Dijon mustard 2 tablespoons
Worcestershire sauce 1 tablespoon
Paprika 1 teaspoon
Salt and pepper To taste
Olive oil 2 tablespoons
Fresh parsley (optional) For garnish

Cooking Instructions

    1. Preheat your grill or stovetop pan over medium-high heat.
    2. Season the chicken breasts with salt, pepper, and paprika on both sides.
    1. In a small bowl, mix the honey mustard sauce, Dijon mustard, and Worcestershire sauce.
  1. Brush the chicken breasts with the honey mustard mixture on both sides.
  2. Place the chicken on the grill or pan and cook for about 6-7 minutes on each side, or until the chicken is cooked through and no longer pink in the center.
  3. In a separate pan, sauté the sliced mushrooms with olive oil until they are tender and slightly browned.
  4. Once the chicken is cooked, remove it from the grill or pan and set aside.
  5. Preheat your broiler.
  6. On each chicken breast, layer a generous amount of sautéed mushrooms, followed by two slices of crispy bacon.
  7. Top the chicken with a mixture of Colby Jack and cheddar cheese.
  8. Place the chicken under the broiler for about 2 minutes or until the cheese is melted and bubbly.
  9. Garnish with fresh parsley if desired, and serve the OUTBACK STEAKHOUSE ALICE SPRINGS CHICKEN hot with your favorite side dishes.

Tips for a Perfect Outback Steakhouse Alice Springs Chicken

  • For the honey mustard sauce, you can use store-bought or make your own by combining equal parts of honey and Dijon mustard.
  • Marinating the chicken in the honey mustard mixture for a few hours before cooking will enhance its flavor.
  • Use thinly sliced chicken breasts for faster and more even cooking.
  • You can substitute the Colby Jack and cheddar cheese with your favorite cheese blend.
  • To ensure the bacon is crispy, cook it separately in a pan until it reaches your desired crispiness.

FAQs

Q: Can I use different types of cheese for this recipe? A: Absolutely! While the combination of Colby Jack and cheddar cheese is traditional, you can experiment with other cheeses like Swiss, provolone, or even pepper jack for a unique twist.

Q: Can I grill the chicken outdoors instead of using a stovetop pan? A: Yes, grilling the chicken outdoors will infuse it with a smoky flavor that adds an extra layer of deliciousness to the dish.

Q: How can I make the honey mustard sauce spicier? A: If you prefer a spicier sauce, add a pinch of cayenne pepper or a few dashes of hot sauce to the honey mustard mixture.

Q: Can I prepare the mushrooms in advance? A: Yes, you can sauté the mushrooms ahead of time and store them in the refrigerator until you’re ready to assemble the dish.

Q: Is this recipe suitable for a low-carb diet? A: With some adjustments, this recipe can be adapted for a low-carb diet by using sugar-free honey mustard and omitting the Worcestershire sauce.

Q: Can I add vegetables to the dish? A: Certainly! Feel free to add sliced bell peppers, onions, or asparagus alongside the mushrooms for added color and nutrition.

Now that you have the OUTBACK STEAKHOUSE ALICE SPRINGS CHICKEN recipe and a detailed table sheet format of the ingredients, it’s time to unleash your culinary prowess and create a restaurant-quality meal in the comfort of your own kitchen. This delightful chicken dish is perfect for any occasion, whether it’s a cozy family dinner or a gathering with friends. By following our step-by-step instructions and incorporating your personal touches, you’ll surely create a memorable and mouthwatering experience for everyone fortunate enough to taste your homemade OUTBACK STEAKHOUSE ALICE SPRINGS CHICKEN. Enjoy!

Ten Signs That Your Body Is Not in Balance

Ten symptoms that indicate a problem with your body

Experts claim that there are a variety of signals that your body gives you to let you know when something is wrong.

These warning signs have been gathered by us so that you may help prevent any health issues along the way.

Legs that feel like they are crawling

Restless leg syndrome is a medical condition. It makes you feel as if something is creeping on your legs.


Skin thickening

A hormone imbalance, eczema, or allergies can cause skin thickening. Always consult a doctor to understand your problem better.

A change in handwriting and loss of smell

Changes in movement, speech, and writing can identify Parkinson’s disease.

Aggressive behavior

Aggressive conduct might indicate depression. According to researchers, depression does not always manifest as sadness.

Sleeping too much

Hypersomnia is a sleep condition characterized by excessive sleeping. According to doctors, several autoimmune disorders might create a strong desire to sleep at any time and place.

Changes in eye color

A white or grey ring around the cornea of the eyes indicates that you may have excessive cholesterol if you are under 45 years old.

Craving only salty food

If you crave salty foods all the time, it could be an indication of iron deficiency, anemia, dehydration, or premenstrual syndrome, according to medical specialists.

Fatigue and a low libido

If you are constantly tired and have a low libido, it could be a sign of a thyroid hormone problem.

Feeling thirsty all the time

Feeling thirsty all the time might be caused by eating salty foods, but it can also indicate diabetes or pregnancy.

The need to chew ice

The need and want to chew ice can signify an iron deficiency or anemia. Take some blood tests to be sure!

Do you know other symptoms that can tell much about your body? Tell us in the comments!

No Bake Homemade Crunch Bars Recipe

Indulging in a sweet treat doesn’t always require hours of baking and complicated recipes. If you’re craving something delicious and satisfying, look no further than these delightful No-Bake Homemade Crunch Bars. Packed with the rich flavor of semi-sweet chocolate, the melt-in-the-mouth goodness of coconut oil, and the delightful crunch of crispy rice cereal, these bars are a perfect blend of simplicity and taste. In this article, we’ll guide you through the easy steps of creating these mouthwatering treats.

Ingredients:

Before we dive into the step-by-step instructions, let’s take a look at the key ingredients that make these No-Bake Homemade Crunch Bars a delectable delight:

INGREDIENTS QUANTITY
Semi-sweet chocolate chips 2 cups
Coconut oil 1 tablespoon (for that melt-in-the-mouth feel)
Crispy rice cereal 2 cups

Note: For health-conscious individuals, you can opt for a healthier twist by swapping the semi-sweet chocolate chips with dark chocolate chips.

Instructions:

Prep Your Pan

Start by preparing your pan to ensure easy removal of the bars later on. Line an 8×8-inch square pan with parchment paper. This simple step will make it a breeze to lift and cut your bars.

Melt It Down

In a large microwave-safe bowl, combine your semi-sweet chocolate chips and coconut oil. Microwave the mixture in 20-second intervals, stirring after each interval. Keep microwaving and stirring until the mixture turns smooth and well-combined.

Add The Crunch

Now comes the fun part – adding the crispy rice cereal. Gently fold in the cereal, ensuring that every grain is coated with the luscious melted chocolate. This is where the magic happens, as the combination of textures creates a truly delightful experience.

Set & Forget

Transfer the mixture to the prepped pan, and use a spatula to smooth it out evenly. Pop the pan into the refrigerator for a minimum of 2 hours, allowing the bars to set and become firm.

Slice & Serve

Once the bars are set and ready to be devoured, use the parchment paper edges to lift the block out of the pan. Place it on a cutting board and carefully cut it into your desired bar or square sizes. Now, it’s time to enjoy the fruits of your labor – the delicious No-Bake Homemade Crunch Bars!

FAQs (Frequently Asked Questions)

Can I use dark chocolate chips instead of semi-sweet chocolate chips?

Absolutely! Swapping semi-sweet chocolate chips with dark chocolate chips is a great way to create a slightly healthier version of these bars without compromising on taste.

How long should I refrigerate the bars?

It’s best to refrigerate the bars for a minimum of 2 hours, or until they are set and firm to the touch. This ensures that they hold their shape when you cut them into pieces.

Can I add nuts or dried fruits to the mixture?

Certainly! You can get creative and add chopped nuts, dried fruits, or even a sprinkle of sea salt to enhance the flavor and texture of your crunch bars.

Are these bars suitable for children?

Absolutely! These No-Bake Homemade Crunch Bars are a kid-friendly treat that both adults and children will enjoy. Just be cautious with any potential allergens when customizing the recipe.

How should I store the leftover bars?

To keep the bars fresh and maintain their texture, store them in an airtight container in the refrigerator. They should stay delicious for up to a week.

Can I make these bars in advance for a special occasion?

Definitely! These bars are a wonderful make-ahead dessert. Prepare them a day or two in advance, refrigerate them, and they’ll be ready to impress your guests.

Indulging in a sweet treat doesn’t have to involve hours in the kitchen. With the No-Bake Homemade Crunch Bars recipe, you can create a delightful treat that’s simple, delicious, and satisfying. Whether you’re craving a quick dessert or planning a special occasion, these bars are sure to be a hit. So, gather your ingredients, follow the easy instructions, and treat yourself to the irresistible blend of chocolatey goodness and satisfying crunch. Your taste buds will thank you!

Caramel Cream Cheese Bread

When it comes to delightful baked goods, Caramel Cream Cheese Bread stands out as an irresistible treat that tantalizes your taste buds with every bite. This delectable creation seamlessly marries the velvety smoothness of cream cheese with the luscious sweetness of caramel, resulting in a flavor profile that’s hard to resist. Whether you’re looking for a delightful breakfast option or a mouthwatering dessert, Caramel Cream Cheese Bread fits the bill perfectly. In this article, we’ll dive into the intricacies of crafting this culinary masterpiece, from the essential ingredients to step-by-step instructions that ensure your bread turns out perfect every time.

Ingredients:

Creating a scrumptious loaf of Caramel Cream Cheese Bread requires the perfect blend of ingredients. Here’s what you’ll need:

INGREDIENTS MEASUREMENTS
Flour 2 cups
Sugar 1 1/2 cups
Unsalted Butter (room temperature) 1 cup (2 sticks)
Cream Cheese (room temperature) 1 (8 oz.) package
Eggs (room temperature) 4
Caramel Topping 1/2 cup
Vanilla Extract 1 1/2 teaspoon
Cinnamon 1 ½ teaspoons
Baking Soda 1 1/2 teaspoons
Salt 1/2 teaspoon

Instructions:

Follow these step-by-step instructions to create a delightful loaf of Caramel Cream Cheese Bread:

  1. Preheat your oven to 350º F (175º C) and lightly grease two 9×5-inch loaf pans with butter or non-stick spray.
  2. In a large bowl or mixer, cream together the unsalted butter, cream cheese, and sugar until the mixture is smooth and well combined.
  3. One at a time, beat in the eggs and vanilla extract, ensuring each egg is fully incorporated before adding the next.
  4. In a separate bowl, whisk together the flour, baking soda, salt, and cinnamon until the dry ingredients are thoroughly combined.
    1. Gradually add the dry ingredient mixture into the wet ingredients, stirring until just incorporated. Be careful not to overmix.
    2. Pour a quarter of the batter into each of the greased loaf pans, ensuring an even distribution.
    3. Spoon ¼ cup of caramel topping onto the batter in each pan. Gently swirl the caramel into the batter, taking care to keep it away from the edges of the pan.
    4. Pour the remaining batter on top of the caramel layers, ensuring a smooth and even surface.
    5. Place the pans in the preheated oven and bake for 45-50 minutes, or until a toothpick inserted into the center of the loaf comes out clean.
    6. Once baked, carefully remove the pans from the oven and allow the bread to cool before serving.
    7. Slice and enjoy the delectable fusion of flavors in every mouthwatering bite!

    A Slice of Caramel Cream Cheese Bread: A Heavenly Experience

    Sink your teeth into a slice of Caramel Cream Cheese Bread, and you’ll be greeted by a symphony of flavors. The cream cheese adds a velvety richness to the bread, while the caramel topping infuses each bite with a delightful sweetness. The cinnamon and vanilla extract elevate the aroma and taste, creating a harmonious blend that’s perfect for any occasion.

    FAQs: Your Questions, Answered

    Can I use salted butter instead of unsalted butter?

    While you can use salted butter, it’s recommended to use unsalted butter to have better control over the saltiness in the recipe.

    Can I substitute the caramel topping with another sweet sauce?

    Absolutely! Feel free to experiment with different sweet sauces like chocolate or butterscotch for a unique twist on the classic recipe.

    Is it possible to make this bread without eggs?

    Yes, you can try using egg substitutes like applesauce, mashed bananas, or yogurt. Keep in mind that the texture and flavor may vary slightly.

    Can I freeze Caramel Cream Cheese Bread?

    Yes, you can freeze the bread by wrapping it tightly in plastic wrap and placing it in an airtight container. Thaw at room temperature when ready to enjoy.

    Can I add nuts or dried fruits to the batter?

    Absolutely! Chopped nuts like pecans or walnuts, as well as dried fruits like raisins or cranberries, can add delightful texture and flavor to the bread.

    How long does the bread stay fresh?

    When stored in an airtight container at room temperature, Caramel Cream Cheese Bread can stay fresh for about 3-4 days. You can also extend its shelf life by refrigerating it.

    Caramel Cream Cheese Bread is a culinary masterpiece that combines creaminess and sweetness in every heavenly bite. With its rich flavor and delightful aroma, this bread is the perfect addition to any meal or occasion. Whether you’re an experienced baker or just starting your culinary journey, crafting this delectable treat is a rewarding experience that’s sure to impress your taste buds and those of anyone lucky enough to try it.

This is what Shiloh Jolie-Pitt, Brad and Angelina’s first biological child, looks like today

Shiloh inherited the best from both her parents.

We have witnessed many times how the onscreen chemistry between actors working on a set side by side has quickly been brought into their private life. Take the most famous, now ex, couple Brad Pitt and Angelina Jolie for example. When the two filmed Mr. and Mrs. Smith together in 2004, Pitt was still married to lovely Jennifer Aniston, but that didn’t stop the Hollywood heartthrob from falling in love with sex icon Jolie thus giving the world “Brangelina,” one of most popular couples in the entire world.

“Because of the film, we ended up being brought together to do all these crazy things, and I think we found this strange friendship and partnership that kind of just suddenly happened. I think a few months in I realized, ‘God, I can’t wait to get to work.’ … Anything we had to do with each other, we just found a lot of joy in it together and a lot of real teamwork. We just became kind of a pair,” Jolie told People in 2006.

The two stayed together for 12 years and are parents to Angelina’s three adopted children Maddox, Zahara and Pax, and their three biological children, Shiloh and twins Vivienne and Knox.

The news of Jolie’s pregnancy was huge and caused media frenzy. Paparazzi followed the couple’s every step as the whole world was anticipating for the couple’s first child to be brought into the world. Magazines were offering $1 million for an exclusive photo of the child who was a celebrity even before being born.

New York magazine wrote at the time, “Not since Jesus has a baby been so eagerly anticipated.”

Shiloh was born May 27, 2006, and Pitt and Jolie sold the photo of her for whooping $14 million, money they donated to UNICEF.
”While we celebrate the joy of the birth of our daughter, we recognise that 2 million babies born every year in the developing world die on the first day of their lives. These children can be saved, but only if governments around the world make it a priority,” the couple said in a statement.

Shiloh, who would be 16 soon, has practically been under the spotlight since forever.
She seems to have inherited the best from her famous parents and looks gorgeous. However, something about her caused a stir among fans; the way she dressed. She even asked from her parents and siblings to call her John instead of her real name.

During an interview with Oprah, dad Pitt confessed, ”She only wants to be called John. John or Peter. So it’s a Peter Pan thing. So we’ve got to call her John” He then added, ‘Shi, do you want …’ – ‘John. I’m John.’ And then I’ll say, ‘John, would you like some orange juice?’ And she goes, ‘No!’ So, you know, it’s just that kind of stuff that’s cute to parents, and it’s probably really obnoxious to other people.”

Jolie also spoke of her daughter’s wish to dress as a boy and told Vanity Fair, “She wants to be a boy. So we had to cut her hair. She likes to wear boys’ everything. She thinks she’s one of the brothers.”

Neither Pitt nor Jolie, however, seemed to have a problem with this. They supported their girl in whatever she chose to be.
Jolie said it was a bit hard for her not to call her Shiloh any longer as that name was of great significance to her, but she respected the girl’s will.

“It was a name my parents almost named their first child — there was a miscarriage: Shiloh Baptist. Because my father had been shooting in Georgia and that was the most southern name [my parents] could come up with,” Jolie said of the name she originally gave her daughter.

After the couple split, they have arranged custody rules which seem to be working well so all the kids get to spend time with their mom and their dad. Both Pitt and Jolie are devoted parents who would always go an extra mile for their kids’ well being.
”Brad is so proud of Shiloh and who she has become. He loves that she always stays true to herself and is so good to her brothers and sisters,” source told ET, adding the two are very close.

Jolie, who is considered a feminist that girls look up to, spoke of the importance of women on the International Women’s Day, saying: “I have spent the last two months in and out of surgeries with my eldest daughter [Zahara], and days ago watched her younger sister [Shiloh] go under the knife for hip surgery. So my wish on this day is that we value girls. Care for them. And know that the stronger they grow, the healthier they will be and the more they will give back to their family and community.”

Back in 2021, Shiloh left the world in awe after she appeared alongside her famous mother for the premiere of Marvel’s “Eternals” wearing her mom’s Dior gown that Angelina wore at a press conference for a Maleficent: Mistress of Evil event in 2019. Shiloh grew her hair, which was in a bun, and looked amazingly beautiful.


Back in 2021, Shiloh left the world in awe after she appeared alongside her famous mother for the premiere of Marvel’s “Eternals” wearing her mom’s Dior gown that Angelina wore at a press conference for a Maleficent: Mistress of Evil event in 2019. Shiloh grew her hair, which was in a bun, and looked amazingly beautiful.

For the Rome premiere, Shiloh opted for a little black dress she paired with yellow and black snickers.

Please SHARE this story with your family and friends on Facebook!

Old Fashioned Apple Dumplings

Transport yourself to a bygone era with the comforting taste of Old Fashioned Apple Dumplings. This classic dessert embodies tradition and warmth, offering a delightful combination of sweet apples, buttery pastry, and fragrant spices. In this article, we’ll provide you with a table sheet format of the ingredients needed to craft your very own Old Fashioned Apple Dumplings. Get ready to experience the timeless charm of this beloved dessert.

Here’s a quick overview of the ingredients you’ll need to create your Old Fashioned Apple Dumplings:

INGREDIENTS QUANTITY
Apples 4 medium
Prepared pie crusts 2
Unsalted butter 1/2 cup
Granulated sugar 1 cup
Ground cinnamon 1 teaspoon
Water 1 1/2 cups

Crafting Your Old Fashioned Apple Dumplings Masterpiece

1. Preparing the Apples

Peel, core, and halve the apples. Place each apple half on a square of prepared pie crust.

2. Adding the Sweet Filling

In a small bowl, mix together 1/2 cup of granulated sugar and 1/2 teaspoon of ground cinnamon. Sprinkle this mixture onto the cut side of each apple.

3. Wrapping the Dumplings

Fold the pie crust over each apple half, sealing the edges by pressing with a fork.

4. Creating the Cinnamon Sauce

In a saucepan, melt the unsalted butter over medium heat. Add the remaining 1/2 cup of granulated sugar, 1/2 teaspoon of ground cinnamon, and water. Stir to combine.

5. Simmering the Dumplings

Place the wrapped apple dumplings in a baking dish. Pour the cinnamon sauce over the dumplings.

6. Baking to Perfection

Preheat your oven to 375°F (190°C). Bake the apple dumplings in the preheated oven for about 40-45 minutes, or until the pastry is golden brown and the apples are tender.

7. Glazing and Serving

As the dumplings bake, baste them occasionally with the cinnamon sauce. Once baked, remove the dumplings from the oven and spoon the sauce over them.

Tips for a Nostalgic Treat

  • Serve the dumplings warm with a scoop of vanilla ice cream or a dollop of whipped cream.

FAQs

Q: Can I use a different type of apple? A: Yes, you can experiment with various apple varieties to achieve different flavors and textures.

Q: Can I use store-bought cinnamon roll dough? A: While pie crust is traditional, you can use cinnamon roll dough for a twist on the classic.

Q: Can I make the dumplings ahead of time? A: The dumplings are best enjoyed fresh, but you can assemble them and refrigerate until ready to bake.

Q: Can I use brown sugar instead of granulated sugar? A: You can use brown sugar for a richer flavor, but it will alter the appearance of the dumplings.

Q: Can I freeze the dumplings? A: Freezing may affect the texture of the pastry, but you can try reheating them in the oven.

Q: Can I use a different sauce? A: While the cinnamon sauce is traditional, you can experiment with caramel or butterscotch sauce.

Conclusion

Savor the timeless delight of Old Fashioned Apple Dumplings, a dessert that captures the essence of nostalgia and comfort. With tender apples enveloped in flaky pastry and bathed in a cinnamon-infused sauce, this dessert is a testament to the enduring appeal of classic recipes. Whether enjoyed as a special treat or shared with loved ones, Old Fashioned Apple Dumplings offer a sweet and heartwarming experience.

You’ve been doing it wrong. Here’s the easiest and hassle-free way of cooking bacon

Bacon, a beloved breakfast staple, has the power to turn an ordinary morning into an extraordinary one. Imagine waking up to the irresistible aroma of sizzling bacon, its crispy texture and savory flavor tantalizing your taste buds. In this guide, we’ll walk you through the easiest and hassle-free way to cook bacon that guarantees consistent perfection. Whether you’re a novice cook or a seasoned chef, these simple steps will help you achieve bacon nirvana.

Step 1: Gather Your Supplies

To embark on your bacon-cooking adventure, assemble the necessary supplies:

  • A package of bacon of your choice
  • A large pot with sides
  • For those who adore bacon in generous amounts, we recommend utilizing four packages from Costco. Adjust the quantity to suit your preferences.

Step 2: Prepare the Bacon

  1. Open the package(s) of bacon and halve each slice. This tip is especially useful when dealing with larger quantities. By slicing the bacon in half, you create more manageable strips that ensure uniform cooking.

Step 3: Arrange the Bacon in the Pot

  1. After slicing the bacon, separate the strips and arrange them evenly in the pot. Ensure ample space for each piece to cook correctly. Avoid overcrowding, which can lead to uneven cooking and less crispy results.

Step 4: Apply Heat and Stir as Needed

  1. Place your pot on high heat and start cooking the bacon. Use a spatula to stir the bacon occasionally, ensuring even cooking. As the heat intensifies, the bacon’s fat will melt, resulting in a delightful deep-frying effect. This process imparts a satisfying crispiness while maintaining tenderness and flavor.

Step 5: Enjoy the Delicious Results

  1. Continue to stir and monitor the bacon until it reaches your desired level of crispiness. Cooking times may vary based on bacon thickness and personal preferences. Once the bacon achieves the desired doneness, use a slotted spoon or tongs to remove it from the pot. Allow excess grease to drain before serving.

Expert Tips for Bacon Perfection

  • Experiment with different bacon varieties for unique flavor profiles.
  • For extra-crispy bacon, pat the slices with a paper towel before cooking.
  • Save the bacon grease for cooking other dishes—it adds a delightful depth of flavor.

FAQs about Cooking Bacon

What’s the ideal cooking time for crispy bacon?

Cooking times vary, but it usually takes around 10-15 minutes on high heat for crispy bacon.

Can I use a skillet instead of a pot?

Absolutely! A skillet works well too, but a pot can handle larger quantities more efficiently.

How do I store leftover bacon?

Store cooled leftover bacon in an airtight container in the refrigerator for up to four days.

Can I cook bacon in the oven?

Yes, baking bacon in the oven is another popular method. Preheat to 400°F, lay bacon on a baking sheet, and bake for 15-20 minutes.

What should I do with the leftover bacon grease?

Bacon grease can be saved and used to enhance the flavor of various dishes, such as sautéed vegetables or roasted potatoes.

Is there a healthier bacon alternative?

Yes, turkey bacon and plant-based bacon are lower in fat and calories, making them healthier options.

Cooking bacon doesn’t have to be a hassle; with the right approach, it becomes a simple and satisfying culinary adventure. By following these steps, you’ll master the art of creating perfectly crispy and flavorful bacon each time you cook. So, gather your supplies, prepare the bacon, arrange it in the pot, apply heat, and relish the delicious results. Your mornings will never be the same again!

22 Photos Of Fruits And Vegetables That Seem To Have Come Alive

1. Looks like they are twins
Nature never leaves a chance to surprise us by making amazing inventions. Every now and then it creates something that you have never seen before and is out of a blue creation. One of them being oddly shaped veggies and fruits that seem to have come alive. It looks like they are resembling something that already exists like some body parts, animals, or even human faces expressing emotions.
There’s no doubt about the fact that the fruits and veggies of this world truly make their mark on this planet. They grow in some of the toughest of conditions, and they feed more people than we can count with their goodness and their nutrients. It seems as though they can also give us a laugh every so often, which means that their talents are endless. Yes, these fruits and veggies look like they have come alive.

2. A pumpkin or a swan?
3. This strawberry looks like a baby elephant
4. Milkweed pods looking like parrots
5. Wassup?
6. Seems like this bell pepper is screaming from inside
7. A cherry tomato that looks like it has horns like Satan